
Transforming a sloped yard into a tranquil oasis is easier than you think. Nothing says “serenity” quite like a cascading waterfall gently tumbling down a hillside. Whether you’re dreaming of a modern, geometric water feature, a natural rock-lined cascade, or a stacked-stone formal flow, this DIY guide will walk you through building your very own sloped yard waterfall. It’s easier than it looks, and the end result is pure magic.
Overview: Which Waterfall Style Suits You Best?
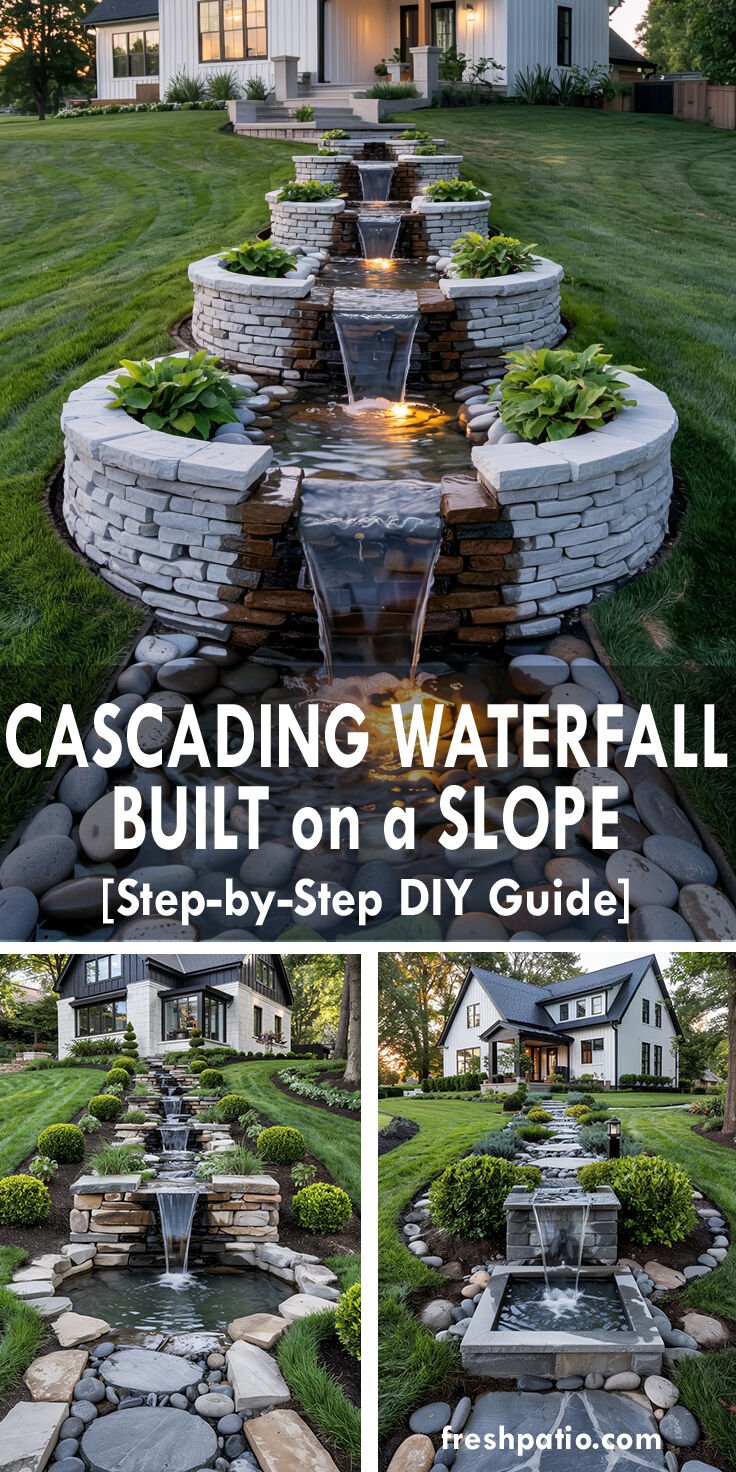
Let’s start with inspiration. Below are three main styles you can model your build after:
Formal Tiered Cascade (Image #1):
Circular stone walls and centered waterfall steps with in-basin lighting.

Observations from Image #1:
-
Design type: Formal, tiered cascading waterfall on a gradual slope.
-
Construction: Circular stone retaining walls form basin-like cascades.
-
Water flow: Water flows from one shallow basin to the next through short spillways.
-
Lighting: Submerged or in-wall waterproof lighting in each basin.
-
Materials: Stacked stone (likely veneer or concrete block), river rock base, and clear pond liner inside basins.
-
Function: This is a closed-loop system – water likely recirculates via a pump hidden at the bottom, sending water back up a buried pipe to the top.
Takeaways:
This image supports a modular, structured DIY waterfall on a gentle slope – ideal for homeowners who want visual drama without a naturalistic look. It also suggests that this type of feature:
-
Does not need to be tied into the home’s plumbing.
-
Can be solar- or low-voltage-lit.
-
Requires basin sealing and proper pump installation.
-
May use plastic or rubber liners inside each level, concealed by decorative stonework.
Natural Rock Waterfall (Image #2):
Freely shaped stone slabs and lush landscaping for a soft, garden-integrated look.

Observations from Image #2:
-
Design type: Cascading waterfall with a natural stone aesthetic.
-
Construction: Flat ledge-style boulders form tiered spillways over a sloped lawn.
-
Water flow: Tall vertical drops with naturalistic overflow into a larger bottom basin.
-
Materials: A mix of stacked fieldstone and natural cut slabs, likely hiding liner basins inside.
-
Surroundings: Blends more naturally into the landscape with soft plantings and curved edges.
-
Bottom pool: A larger final basin that could house the pump and return system.
Key Variations from Image #1:
-
More organic look with irregular stone shapes.
-
Taller falls and steeper vertical drops.
-
Less formal structure – no visible circular wall units.
-
Possibly a more complex excavation process for deeper pooling.
-
Greater focus on natural integration with landscape design.
Added Value:
This second style shows how to adapt cascading waterfall principles to a natural garden environment.
Modern Linear Falls (Image #3):
Rectangular basins with clean edges and a more architectural finish.

Observations from Image #3:
-
Design style: Clean, structured, and modern with straight edges and tightly stacked blocks.
-
Construction: Rectangular trough-style basins with flat spillways and a defined geometric drop.
-
Materials: Cut stone, square basin blocks, dark slate caps, river rock edging.
-
Bottom: Formal rectangular pond at the base – appears prefabricated or custom-poured.
-
Pathway: Integrated stone walkway runs beside the feature.
-
Lighting: Landscape lantern lighting, likely low-voltage, is placed adjacent to the falls.
Key Additions from This Image:
-
This version leans toward a modern minimalist aesthetic – perfect for structured or contemporary homes.
-
Basin shaping is very deliberate, probably lined with a concrete or rigid liner system.
-
Emphasizes geometry and proportion over naturalistic randomness.
-
Excellent example of a modular block construction and square pre-formed pond basins.
-
The lighting element is adjacent, not underwater – adds a useful contrast to Image #1.
Whichever direction you choose, the overall mechanics remain the same—just with aesthetic and layout differences.
Before You Start: Key Planning Questions
-
Where will the water come from?
You’ll use a recirculating pump system that moves water from the bottom basin back to the top. -
Is this connected to your home’s plumbing?
No need! The system is self-contained, much like a pond or birdbath. -
Can it be turned on/off?
Absolutely. A power switch (or even a smart plug) controls the pump. -
Is this the same water circulating?
Yes. It’s a closed loop—you’re not wasting water or pulling from a hose once filled.
Materials & Tools Checklist
Basic Materials
-
Flexible pond liner (EPDM or PVC)
-
Pump (size depends on elevation & flow rate)
-
PVC tubing (to return water uphill)
-
Underlayment fabric (protects liner)
-
Stones (natural or manufactured)
-
Gravel or river rock
-
Basin containers (optional: plastic tubs or prefab ponds)
-
Pond foam or waterproof sealant
-
Low-voltage or solar lighting
-
GFCI outdoor outlet
-
Timer or smart plug
-
Sand or gravel base
Tools
-
Shovel
-
Level
-
Hose (for layout and rinsing)
-
Wheelbarrow
-
Utility knife
-
Drill + bits (for lighting/electrical conduit)
-
Tamper
Step-by-Step: How to Build a Cascading Waterfall on a Slope
Step 1: Design Your Layout
-
Decide on your style (modern, natural, formal).
-
Use a garden hose or rope to outline the course of the waterfall.
-
Plan for 4–6 cascading drops spaced evenly on the slope.
-
Mark the location of the topmost basin (start of the waterfall) and the bottom basin (pump reservoir).
💡 TIP: Each drop should have a 6–12″ fall for visual and acoustic effect.
Step 2: Dig Basins and Channels
-
Start at the bottom and dig the final pond basin. This will house the pump and collect water from above.
-
Working your way up, dig shallow basins for each cascade step.
-
Create small ledges between each level for water to spill over.
-
Line the bottom of each basin with tampered sand or gravel.
⚠️ Excavating too deep? Use plastic basins or form shallow stone walls to elevate each basin above grade.
Step 3: Install Pond Liner and Underlayment
-
Lay underlayment fabric first to protect against sharp rocks.
-
Next, install one continuous pond liner from the top to the bottom. Alternatively, use individual liners per basin.
-
Leave extra liner at the edges—you’ll trim later.
💡 Use flexible EPDM liner for irregular shapes. PVC liner works well for crisp, rectangular basins.
Step 4: Place Pump and Plumbing
-
Install the pump at the lowest basin, fully submerged.
-
Attach PVC tubing to the pump, and run it up the slope to the top basin. Bury the pipe alongside the cascade or hide it behind stones.
-
Leave enough tubing at the top to loop and pour into the top pool.
⚠️ Use a pump with a head height rating that matches your slope height (plus ~20%).
Step 5: Build the Cascades
-
Stack stones or bricks to form walls around each basin.
-
Use flat stones to create spillways for water to flow between basins.
-
Seal gaps using pond foam or non-toxic waterproof construction adhesive.
-
Let the water cascade down naturally from one basin to the next.
💡 Vary stone sizes and angles for a natural flow. Use a level to ensure each spillway tilts slightly forward.
Step 6: Add Lighting (Optional But Glorious)
You’ve got two options:
-
Submersible LED pond lights inside basins (Image #1)
-
Low-voltage path lights or solar uplights along the sides (Image #3)
-
Run electrical wires BEFORE adding final rocks.
-
Use waterproof junction boxes and conduit.
-
Solar options avoid wiring—but may underperform in shaded spots.
💡 Use warm white lights for a cozy glow. Cool lights feel more modern.
Step 7: Test & Adjust
-
Fill the system with water using a garden hose.
-
Turn on the pump and watch for:
-
Uneven spillways
-
Leaks or low spots in liner
-
Overflow or underflow between basins
-
Make any final adjustments by repositioning rocks or sealing edges with pond foam.
Step 8: Landscape Around It
-
Plant moisture-loving perennials or ground covers nearby.
-
Use river rock or flagstones along the edges for a natural path (Image #2 and #3).
-
Consider evergreens or boxwoods for structure.
Winterization and Maintenance Tips
-
Turn it off before first frost and drain the system.
-
Remove the pump and store it indoors for winter.
-
Clean out leaves and debris before winter shutdown.
-
In spring, flush the basins and check for liner damage.
⚠️ DO NOT run the waterfall in freezing temps—it can damage pumps and pipes.
Optional Enhancements
-
Add a biological filter box to help keep the water clear.
-
Use beneficial bacteria treatments in summer to prevent algae.
-
Incorporate a rain collection system to refill the waterfall.
-
Add fish if your bottom basin is large enough (and deep enough in your climate!).
Common Mistakes to Avoid
-
Underpowered pump → weak flow or stagnant water.
-
Incorrect slope planning → water doesn’t flow evenly.
-
Unsealed spillways → water escapes between stones.
-
Too shallow liner edges → splash-out causes dry pump burnout.
-
Skipping underlayment → liner gets punctured from below.
Final Thoughts
Building a cascading water feature into your sloped yard is one of the most rewarding DIY landscaping projects you can take on. It elevates your home’s curb appeal, adds value, and brings peaceful sound and movement to your outdoor space. Whether you’re drawn to clean lines, organic flow, or traditional garden elegance—there’s a cascading style for you.
So grab a shovel, sketch out your slope, and let the water do the talking.


